Oil Paint Photo Editing Full Tutorial
Tutorial
In this tutorial, I will show you the steps I took to create the Oil Paint Photo Editing Full Tutorial.
Transform your photographs into reasonable oil painting by using Photoshop Tools, Thissensible oil painting Tools which is available in photoshop will transform your image into a bit of workmanship shortly. In this, we are making use of sharpen tool and stylize tool to changing a normal image to oil paint style, Sharpening Tool in Photoshop improve the apparent detail in a picture by modifying contrast at the pixel level.
Details of Tutorials:- Software: Photoshop CS6
- Completion of Time: 10 Minutes
- Difficulty: Difficulty
Resources- Boy Image
- Software: Photoshop CS6
- Completion of Time: 10 Minutes
- Difficulty: Difficulty
- Boy Image
There are some steps we have to follow.
STEP 1:
Open Photoshop.
STEP 2:
Create a new layer by clicking File > New, then set background height, width, color, and resolution.
STEP 3:
Import man image by clicking File > Open, unlock that image by clicking the right side of the unlock button, then we have to make a copy of that image by clicking the right side of the layer of the image, select this man image by clicking Rectangular Marquee Tool then click in select and mask option on the property bar, click select subject, then right click then select Layer on a cut then click OK by doing like this you can get an only image without any background.
STEP4 :
After that by clicking the bottom of the options for creating a new layer, then by clicking the left side of the tool bar in that Paint Bucket Tool, apply this on the new layer like this as shown below, Then merge both layers by clicking the right side of the option in that select Merge Layers.
STEP 6:
For converting our normal image to oil paint, by clicking an option on the Menu bar that is Filter > sharpen > smart sharpen in that change some values for Radius, Reduce Noise and much more, then click OK, it all depends on you like how you will showcase your image to the user.
STEP 7:
Again go to the Filter Tool which is present on the Menu bar then click Filter > Stylize > Diffuse in that select Anisotropic then click OK. After that rotate image in all the directions and apply Diffuse to look better fir that click on Image Tool which is present on the Menu bar then click on Image Rotation, using this tool you can rotate all the angle and apply Diffuse option, then convert this normal image to smart object by right clicking on this layer then choose Convert to Smart Object, make two copy of this layer by clicking (ctrl+j) as a shortcut.
STEP 8:
Again for more clarity do the same thng as we did previous steps like sharpen for that
by clicking an option on the Menu bar that is Filter > sharpen > smart sharpen in that change some values for Radius, Reduce Noise and much more, then click OK and for stylize go to the Filter Tool which is present on the Menu bar then click Filter > Stylize > Diffuse in that select Anisotropic then click OK, then rotate image in all the directions and apply Diffuse to look better fir that click on Image Tool which is present on the Menu bar then click on Image Rotation, using this tool you can rotate all the angle and apply Diffuse option.
STEP 9:
Using Filter Gallery we can edit and filter individual layers for that goto Filter > Filter Gallery > Artistic then in that select cutout option then set the values for Edge simplicity and Edge Fidelity then click OK.
STEP 10:
we already did a copy of layer in that copied layer enable first copied layer by clicking the check box and for this particular layer make sharpen by clicking an option on the Menu bar that is Filter > sharpen > smart sharpen in that change some values for Radius, Reduce Noise and much more, then click OK and goto Filter > Filter Gallery > Artistic then in that select cutout option then set the values for Edge simplicity and Edge Fidelity then click OK.
STEP 11:
Again enable second copied layer by clicking check box and for this particular layer make sharpen by clicking an option on the Menu bar that is Filter > sharpen > smart sharpen in that change some values for Radius, Reduce Noise and much more, then click OK and to make image like smoothing and glowing we make use of tool called High Pass for that click on Filter > Other > High pass then set Radius for this layer by 2.0 and click OK after that select this layer and change layer to Overlay for creating Vintage Effect.
STEP 12:
After that group that both copied layers as one group by clicking shortcut (ctrl+shift+alt+E)
for making as one group of layers.
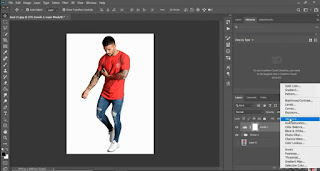
By clicking the bottom option for create a new fill or adjustment layer > Levels then make adjustment as shown below.
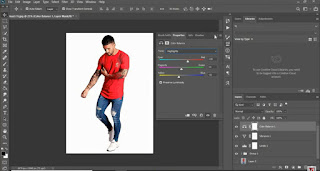
By clicking the bottom option for Create a new fill or adjustment layer > Colour Balance then make adjustment as shown below.
Once our all editing is done then go to File >save or else press (ctrl+s) to save that image.
For a glance you can watch this video :
https://www.youtube.com/watch?v=x2lD5SqJj4k
For Download Images Click Here Below Button 👇
1. Image1If You Like Oil Paint Photo Editing Full Tutorial, Then Give Thumbs up!
Hopefully, You love this article, and We believe you have successfully edited your image. Thanks for being with us. If a Query, Share with us your valuable opinion and feedback in the comment section down below.


Post a Comment