Poster Design Strawberry Flavor in Photoshop

Tutorial
Guys, In this tutorial, I will show you the steps I took to create the Poster Design Strawberry Flavor in Photoshop.
Details of Tutorials:- Software: Photoshop CS6
- Completion of Time: 38 Minutes
- Difficulty: Medium
Resources:- Strawberry
- Splash Paint
- Software: Photoshop CS6
- Completion of Time: 38 Minutes
- Difficulty: Medium
- Strawberry
- Splash Paint
There are some steps we have to follow.
STEP 1:
Open Photoshop.
STEP 2:
Import Strawberry Object by clicking File > Open, and place that onto the main layer.

STEP 3:
Take a New Layer by clicking on the bottom tool options and apply white color by clicking on Adjustment Layer > Solid Color > OK, and adjust the layer as our need, make a duplicate of this layer by right-clicking Duplicate Layer then click OK then unseen that original strawberry layer.

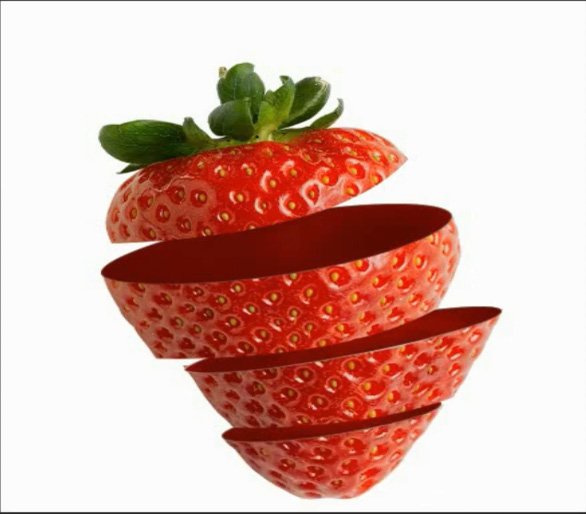
STEP 4:
To make a slice of the strawberry we will use Pen Tool to create a path, for that go to the left side of the toolbar that clicks on Smudge Tool > Pen Tool then click on Make Selection for doing this it will make a separate some part of strawberry from this object and it will be present on a new layer.

STEP 5:
As we did in step 4, like that separate some more slices of the strawberry by using a pen tool which is available in the smudge tool.

STEP 6:
To Fill the color on the above slice of the strawberry you can fill the color on that selected area using the Ellipse Tool which is located on the left side of the toolbar and adjust it on the part of the strawberry.

STEP 7:
Like this make on the rest of the strawberry slices as we did on step 6.

STEP 8:
Using the Brush option you can apply color on that ellipse layer as shown below.
STEP 9:
To give white lining on around the ellipse circle we use Pen Tool for creating path on ellipse circle for that click on Pen Tool, then rightclick on that selected path then click on Stroke Path > Brush Tool >OK, then again rightclick on that path then click on Delete Path.

STEP 10:
Like this, create a path on the rest of the slices as we did in step9.

STEP 11:
Import Splatter Object by clicking File > Open, and place that on above the slice layer and by right clicking on that splatter object click on wrap option to drag manually to adjust with slice layer and set the opacity to 32%, then click on vector mask option which is located on the bottom side of the option then click on brush option set opacity then apply and adjust it.

After that add splash droplets on to the strawberry slices and around the strawberry so that it should look like strawberry slice droplets splashing outside from the strawberry, for that click on Rectangular Marquee Tool to select that droplet and using Move Tool you can drag and drop that droplets onto strawberry and with the help of Magic Erase Tool you can erase the background of that droplets, then adjust the layers as we shown below.

STEP 13:
Click on New Layer which is located at the bottom side of the options with the help of brush option you can apply black color on bottom of the strawberry, adjust the opacity of the black color and adjust the layers as we shown below.

For a glance you can watch this video :
https://www.youtube.com/watch?v=HCvjHMCS60A&t=1191s
For Download PDF File Click Here Below Button 👇

For Download Images Click Here Below Button 👇
1. Image1If You Like Poster Design Strawberry Flavor in Photoshop, Then Give Thumbs up! Hopefully, You love this article, and We believe you have successfully edited your image. Thanks for being with us. If a Query, Share with us your valuable opinion and feedback in the comment section down below.
Post a Comment