Edit Dark Tone Effect With Glowing Butterfly

Tutorial
Guys, In this tutorial, I will show you the steps I took to create the Edit Dark Tone Effect With Glowing Butterfly.
Details of Tutorials:- Software: Photoshop CS6
- Completion of Time: 13 Minutes
- Difficulty: Medium
Resources:- Girl Image
- Butterfly Image
- Software: Photoshop CS6
- Completion of Time: 13 Minutes
- Difficulty: Medium
- Girl Image
- Butterfly Image
There are some steps we have to follow.
STEP 1:
Open Photoshop.
STEP 2:
Import girl image by clicking File > Open, unlock that image by clicking the right side of the unlock button.

STEP 3:
Import butterfly image by clicking File > Open, then drag that butterfly image and drop it onto the main layer of girl image, by clicking Magic Erase Tool which is located at the left side of the toolbar using that tool you can erase that white background.

STEP 4:
After that make a duplicate of the layer by right-clicking on the layer then click on Duplicate Layer, then change that layer from Normal to Screen.

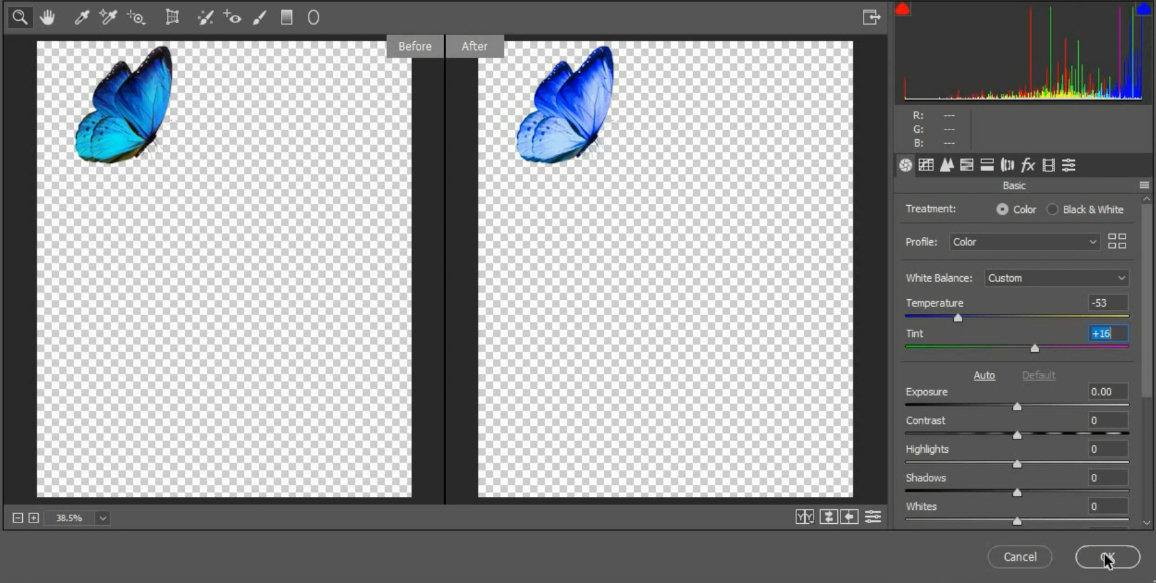
STEP 5:
After that using Camera Raw Filter, you can change the tone of the color.
STEP 6:
Blur the butterfly image by clicking Gaussian Blur for that click on Filter > Blur > Gaussian Blur and set the radius value for Gaussian Blur to 7.8.

After that make a duplicate layer for this butterfly and blur this butterfly layer by changing the radius of the Gaussian Blur value to 101.4 for that click on Filter > Blur >Gaussian Blur.

STEP 8:
Again make a copy of that butterfly layer by right clicking on original layer then click on Duplicate Layer, after that again blur this copied layer by changing the radius value of Gaussian Blur to 378.2 , to adjust the color of the image click on Adjustment Layer > Hue/Saturation as shown below.

STEP 9:
In this step, we are using the Exposure option to increase the contrast of the scene of the image, for click on Adjustment Layer > Exposure.

STEP 10:
After that apply the white mask on the face by clicking the Vector Mask which is present on the bottom side of the option.

STEP 11:
Make a copy of Hue/Saturation Layer, then drag that copied layer above the Exposure layer, then click on Vector Mask option then click on ctrl+i for inverting and apply brush on to the image, the main purposes of this using this inversion is we don't want full image and also we need in future, for that we will use inverted.

Select New layer by clicking bottom of the option, using Brush option apply blue color on that layer, then click on Adjustment Icon > Selective color, the main purpose of using selective color is to adjust some more to the existing color of an image.

STEP 13:
By clicking on that layer only adjust the Opacity of an image and change that layer from Normal to Linear Dodge (Add).

STEP 14:
After all the editing is done, then save this image by clicking on File > Save.
For a glance you can watch this video :
For Download PDF File Click Here Below Button 👇

For Download Images Click Here Below Button 👇
1. Image1If You Like Edit Dark Tone Effect With Glowing Butterfly in Photoshop, Then Give Thumbs up! Hopefully, You love this article, and We believe you have successfully edited your image. Thanks for being with us. If a Query, Share with us your valuable opinion and feedback in the comment section down below
Post a Comment