Rails Inside Illusion Photo Manipulation Photoshop Tutorial

Tutorial
In this tutorial, I will show you the steps I took to create the Rails Inside Illusion Photo Manipulation in Photoshop.
This is one of Best video in that you will learn more editing tool with respect to photoshop.
Details of Tutorials:- Software: Photoshop CS6
- Completion of Time: 12 Minutes
- Difficulty: Difficult
Resources:- Camera
- Boy Image
- Track Object
- Software: Photoshop CS6
- Completion of Time: 12 Minutes
- Difficulty: Difficult
- Camera
- Boy Image
- Track Object
There are some steps we have to follow.
STEP 1:
Open Photoshop.
STEP 2:
Import an camera object by clicking File > Open, unlock that image by clicking the right side of the unlock button, then we have to make a copy of that image by clicking the right side of the layer of the image, then make a duplicate of this layer by clicking the right side of this layer and click Duplicate Layer.

STEP 3:
After opening an image using Pen Tool you can select the front of camera then right click on that selected area then click on Make Selection.

STEP 4:
Then apply solid black color which is located at the bottom of the Adjustment Layer, for that go to Adjustment Layer > Solid Color > Black.

Select the copied layer Click on Adjustment Layer > Curves for changing the lightening of object.

STEP 6:
Then by clicking shortcut keyword (ctrl+i) for applying black color, the main motto of Invert Selection it will apply for opposite selected area is that whatever area we selected, then using brush option you can apply black color.

STEP 7:
By clicking the Levels option we can change the color tone of the image for that go to Adjustment Icon which is located at the bottom of the Layer.

STEP 8:
Import an Nature object by clicking File > Open, unlock that nature image by clicking the right side of the unlock button, then we have to make a copy of that image by clicking the right side of the layer of the image, then make a duplicate of this layer by clicking the right side of this layer and click Duplicate Layer and adjust it, for a while, click on visibility option to disable that original image, then click on Create Clipping Mask to copied layer, using this option you can fix this nature image on inside the camera.

STEP 9:
Using Polygonal Lasso tool you can select the original layer of nature in that select the track area how much you want then select that track area and connect it inside the nature area in such a way that it should look like rail track is there inside camera.

After connecting track then you can make a copy of this selected area and then change the color tone of the object for that go to Adjustment Icon which is located at the bottom of the Layers then click on the Levels option.

STEP 11:
Using Brush Tool you can modify the colors as shown below.

STEP 12:
Select the track layer, then go to Adjustment Icon which is located at the bottom of the Layers then clicks on the Curve option for shadowing and highlighting the track layer then using Brush Tool you can modify the colors.

STEP 13:
Then Create a New Layer and using Brush Tool apply black color at the side of the rail track, then adjust the opacity.

STEP 14:
Create a New Layer and click on Eye Dropper Tool, apply on circle of camera then change the blending mode of the layer to Lighter Color then set the opacity to 54%.

STEP 15:
Create a New Layer and click on Eye Dropper Tool, apply on circle of camera then change the blending mode of the layer to Color Dodge then set the opacity to 68%.

STEP 16:
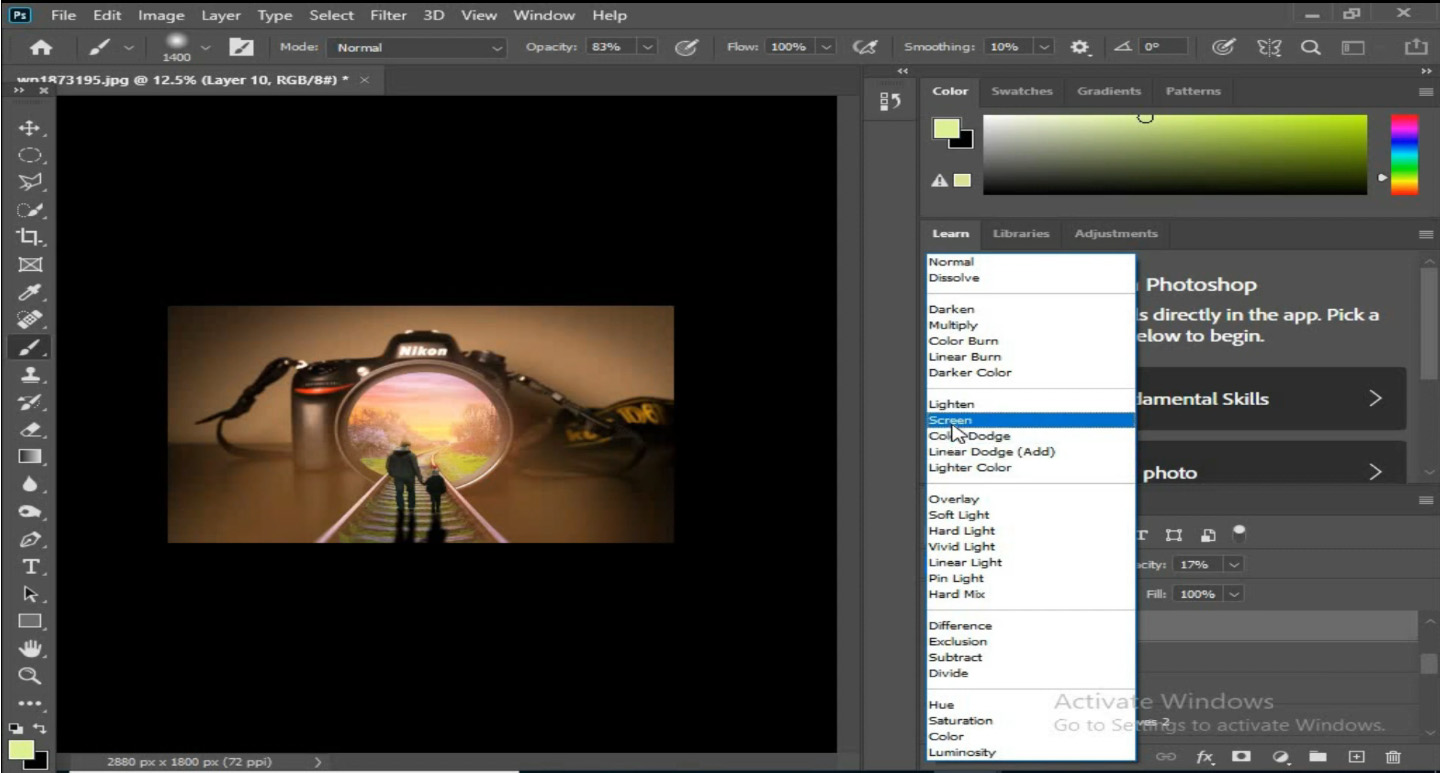
Create a New Layer and click on Eye Dropper Tool, apply on circle of camera then change the blending mode of the layer to Screen then set the opacity to 74%.

STEP 17:
Import an man image by clicking File > Open, unlock that image by clicking the right side of the unlock button, then using Quick Selection Tool you can select the only image and place it on rail track and adjust the layers.

STEP 18:
After selecting the man image apply Camera Raw Filter for man image, using Brush Tool option apply black color on man image then click on Convert to Smart Object, then make a duplicate of layer by right clicking on the man image layer, then select Duplicate Layer.

STEP 19:
Make a reverse of the man image by clicking on Edit > Transform > Flip Vertical.

STEP 20:
After that apply Hue/Saturation for the image.

STEP 21:
Then blur image by clicking Menu Tool Bar option for that go to Filter > Blur > Gaussian Blur and set radius to 9.2 , after that click on Dodge Tool and Burn Tool to apply this on backside of the man image.

STEP 22:
Then blur image by clicking Menu Tool Bar option for that go to Filter > Blur Gallery> Iris Blur.

STEP 23:
Using Brush Tool option you can apply color on side of the rail track, then adjust the Opacity to 20.

Again Click on Brush Tool option to apply color on the side of the rail track, then click on screen option, set Opacity to 37%.

STEP 25:
Create a New Layer by clicking on bottom tool bar, in that select Brush Tool, click on Screen option then set Opacity to 17%.
Select the track layer, then go to Adjustment Icon which is located at the bottom of the Layers then clicks on the Curve option for shadowing the track layer then using Brush Tool you can modify the colors, adjust the Opacity to 87%, then using Eraser option you can erase the unwanted area.

After click on layer which we applied color on green and maroon, and then applied Vector Mask on that as we shown below.

STEP 28:
Then blur image by clicking Menu Tool Bar option for that go to Filter > Blur Gallery> Iris Blur, then set that Blur value as shown below.

STEP 29:
Select the layer, then go to Adjustment Icon which is located at the bottom of the Layers then clicks on the Curve option for shadowing the track layer then using Brush Tool you can modify the colors.

Select the area and then change the color tone of the object for that go to Adjustment Icon which is located at the bottom of the Layers then click on the Levels option.

STEP 31:
To change the color of the image and contrast go to Adjustment Icon which is located at the bottom of the Layers then click on the Brightness and Contrast option.

STEP 32:
After all the editing is done, then save the image by clicking on File > Save to save this whole image.
For a glance you can watch this video :
For Download PDF File Click Here Below Button 👇

For Download Images Click Here Below Button 👇
1. Image1If You Like Rails Inside Illusion Photo Manipulation in Photoshop, Then Give Thumbs up! Hopefully, You love this article, and We believe you have successfully edited your image. Thanks for being with us. If a Query, Share with us your valuable opinion and feedback in the comment section down below.
Post a Comment